
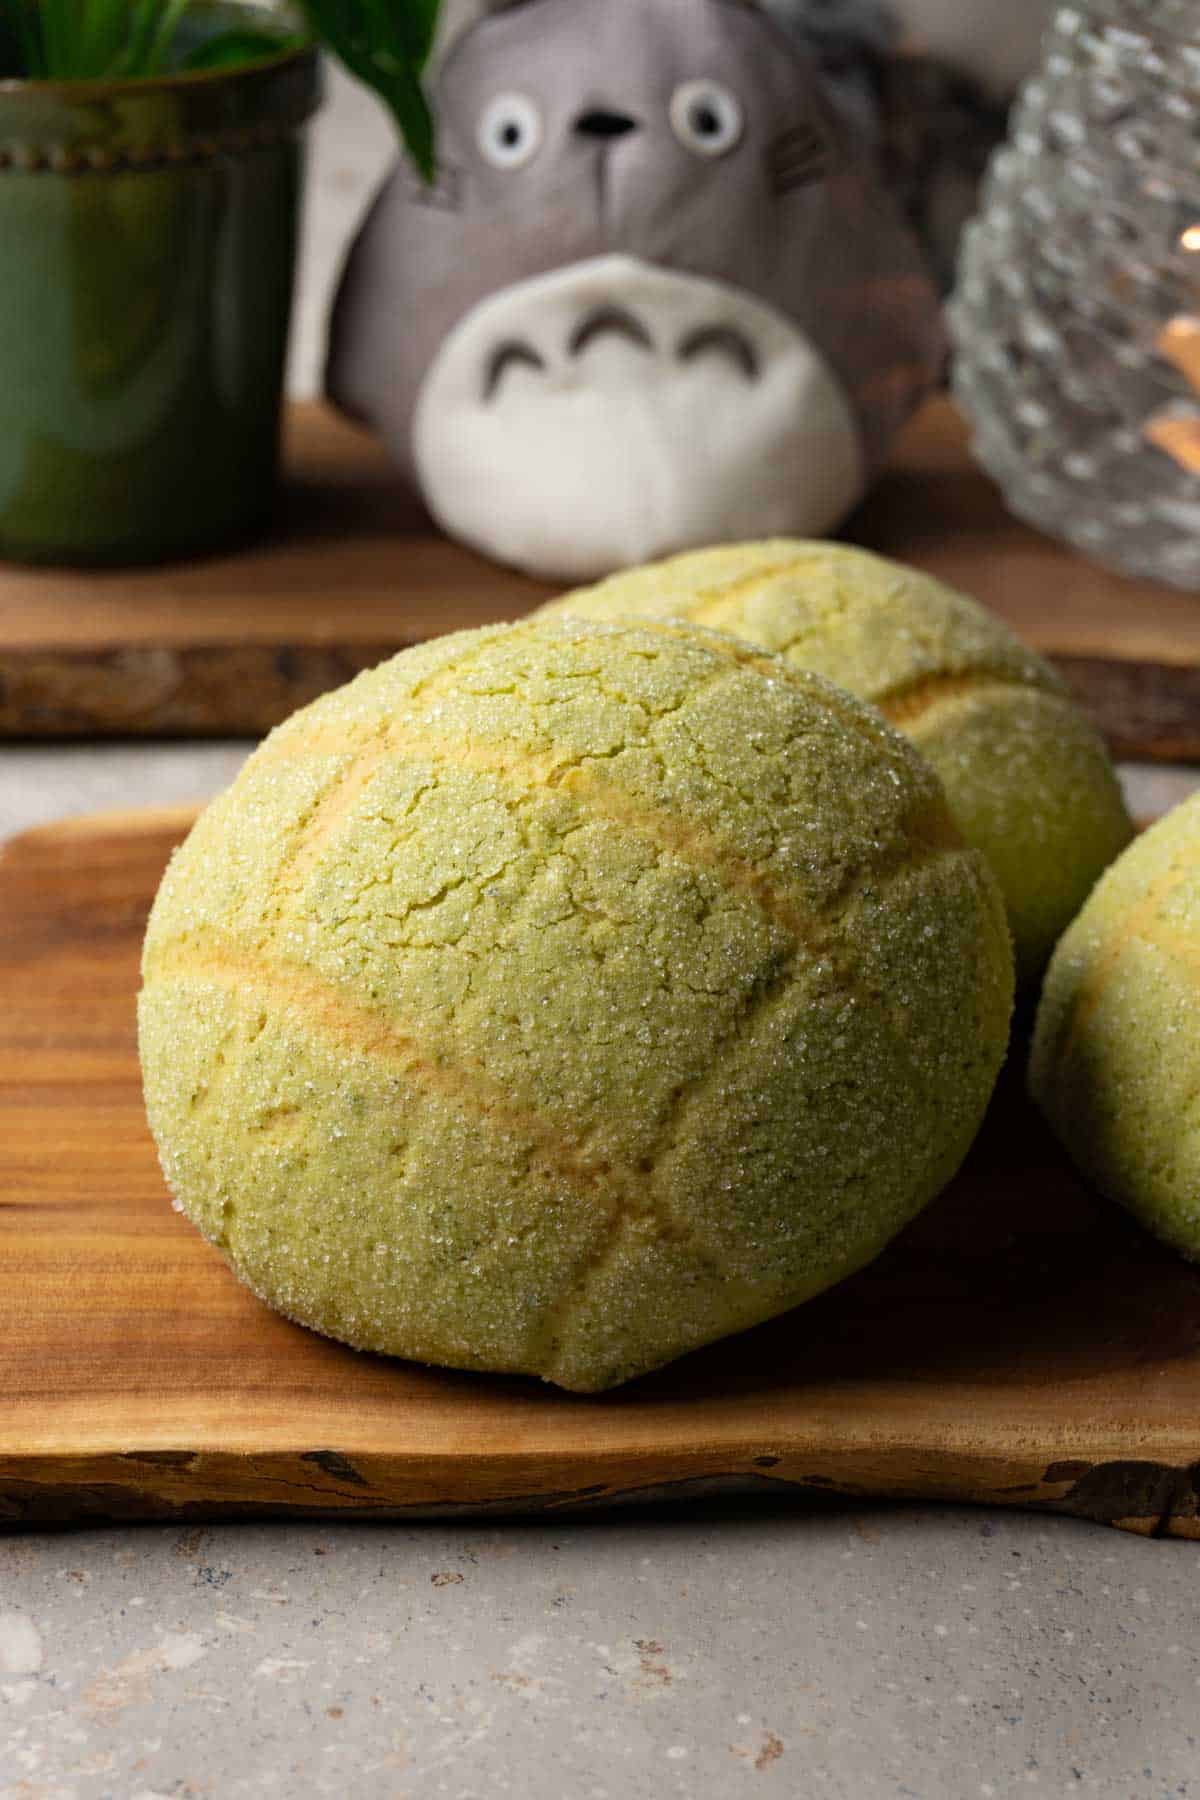
If you've ever wandered through a Japanese bakery, you've likely come across Japanese melon bread - also known as melon pan. With its soft, fluffy interior and its crunchy cookie topping, it's one of the most iconic and beloved baked goods in Japan. Despite the name, melon bread usually doesn't contain any melon flavor. Instead, the name comes from its melon-like appearance.
What is Japanese melon bread
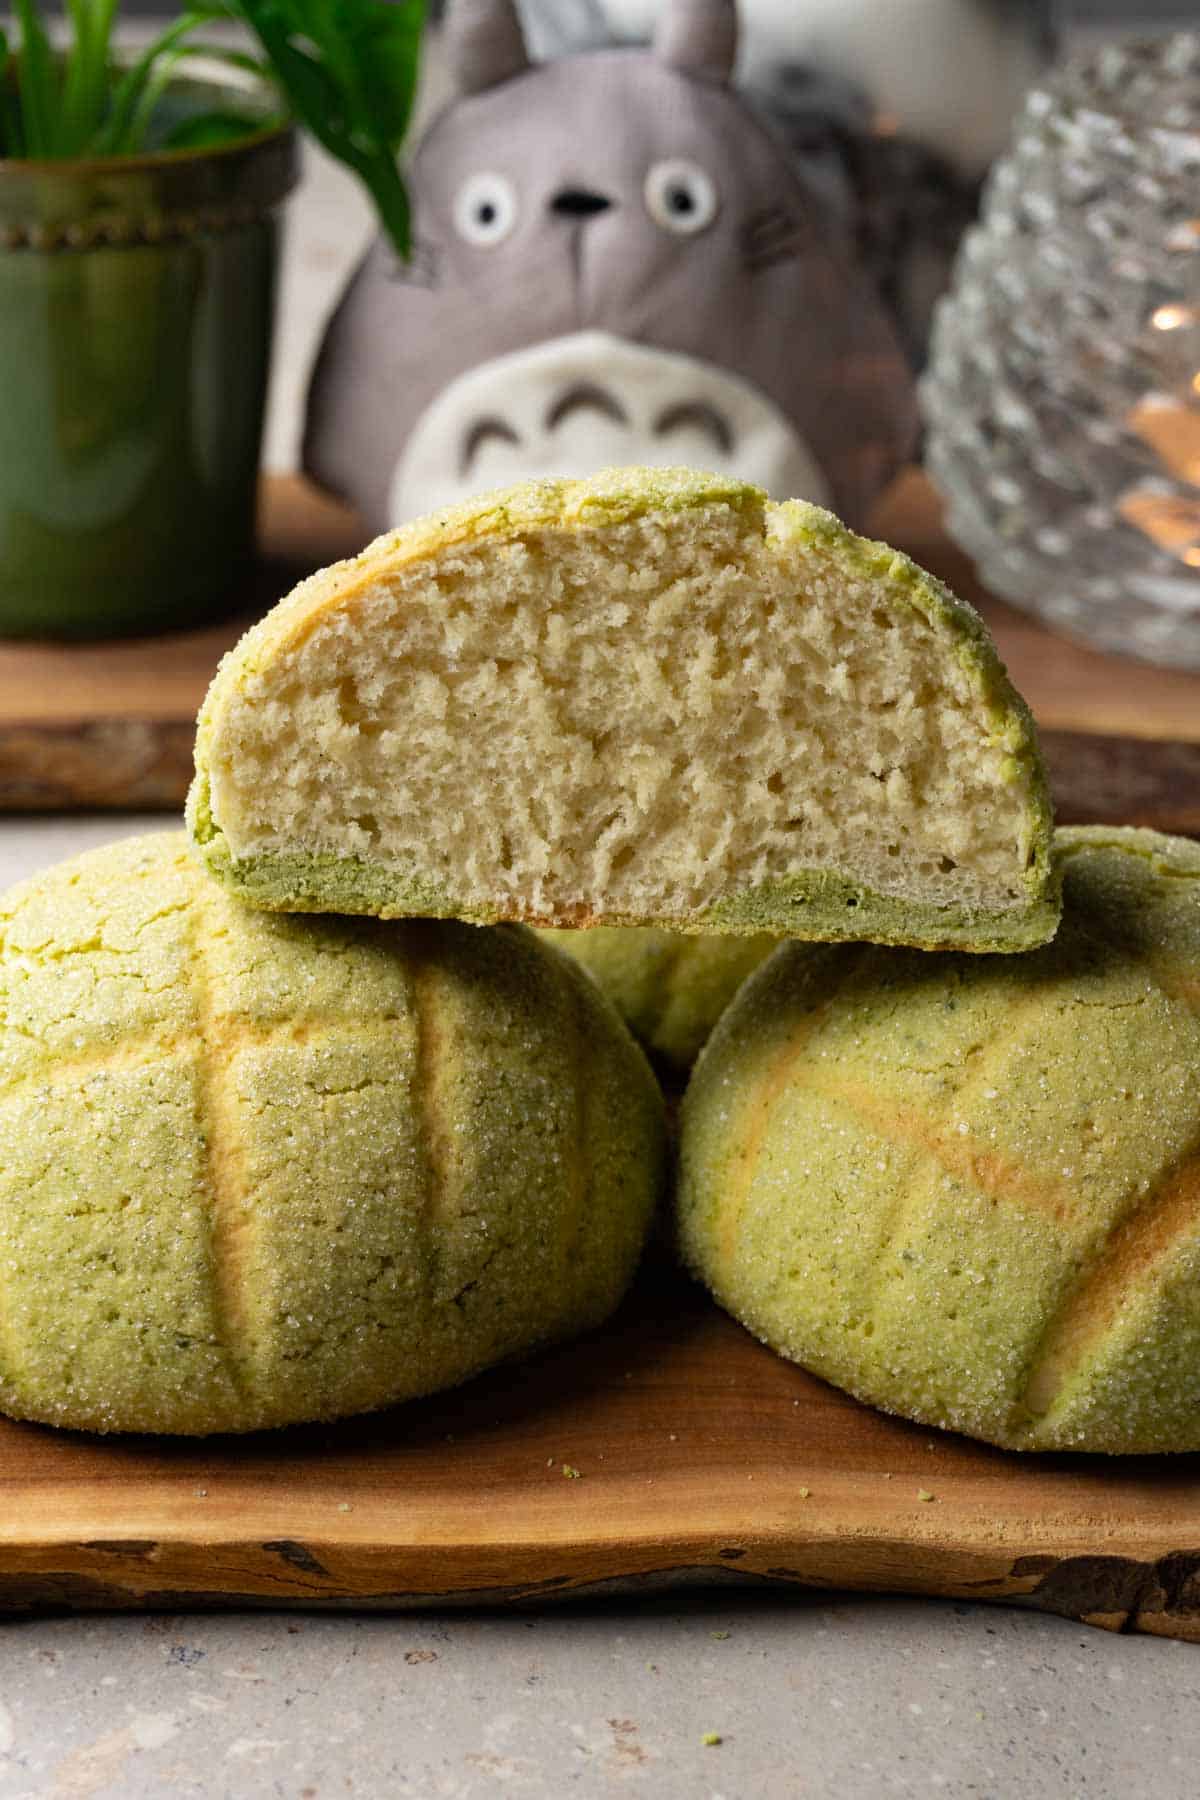
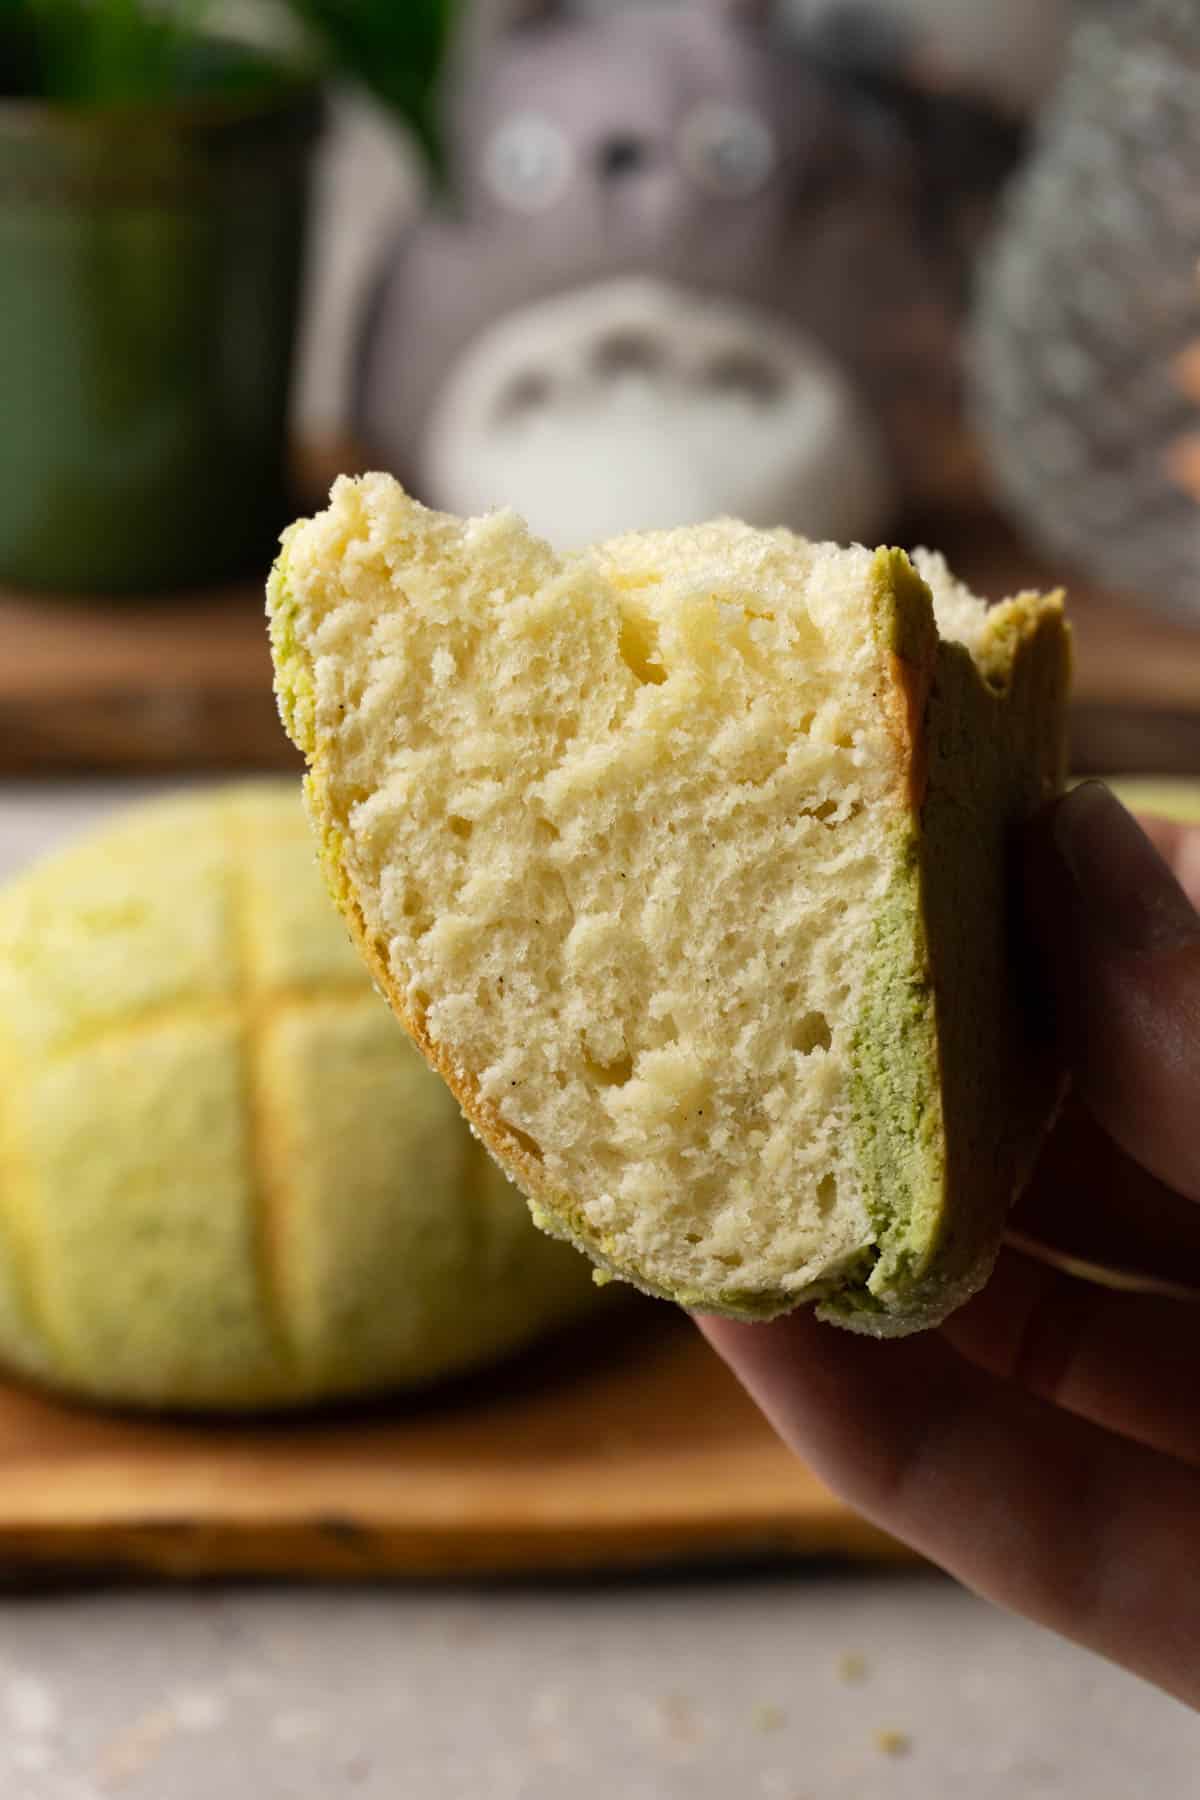
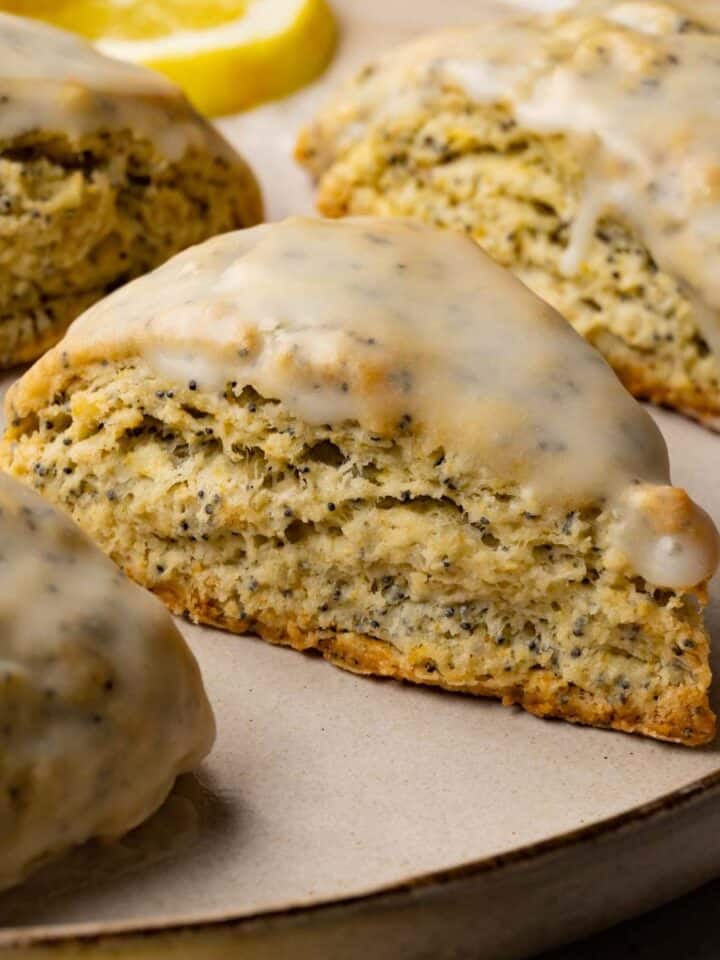
Japanese melon bread is a sweet bun with a soft, yeasted base and a thin cookie dough layer on top that crisps up beautifully in the oven. It's airy on the inside, crunchy on the outside, and just sweet enough to make you reach for another.
While many versions are plain, you can find melon pan filled with custard, chocolate chips, or even flavored with matcha or strawberry. In this recipe, I've added a touch of ceremonial-grade matcha to the cookie crust for a green tea flavor, but you can skip it for a classic take.
Are you looking for more matcha inspired recipes? Look no further! Check out these Matcha Cookies with chocolate glaze, or this absolutely delicious Matcha cake.
Ingredients you will need
Flour - You will need bread flour for the bread dough and all-purpose flour for the cookie topping.
Sugar - Use white granulated sugar for both the bread and the cookie dough.
Salt - Add some salt to the bread dough only, for flavor balance.
Vanilla extract - I like to give my buns vanilla flavor by adding a little bit of vanilla paste or extract, but you can skip it if you want.
Instant yeast - This recipe calls for instant yeast, but you can substitute active dry yeast or fresh yeast if needed. For correct conversion, check out my detailed guide: Types of Yeast and How to Use Them in Baking.
Butter - To make this melon bread recipe, you need unsalted butter at room temperature.
Whole milk - You can replace it with the same amount of water.
Eggs - Use eggs at room temperature.
Matcha powder - For a vibrant green color and a mild, matcha-latte-like flavor, I recommend using ceremonial-grade matcha. Culinary-grade matcha also works, but expect a deeper, earthier green color and a slightly more bitter taste.
Tips for perfect melon pan
Chill the cookie dough. It's much easier to handle when a little bit firmer.
Leave the bottom slightly exposed. When wrapping the cookie dough around the bread dough, make sure the bottom remains slightly uncovered. This allows the bread to expand freely while baking and prevents the cookie shell from cracking or separating.
Be careful when scoring. Don't cut all the way through the cookie layer, or it may split apart as it bakes.
Don't rush the proofing. Make sure to allow enough time for both the first and second rises. Proper proofing gives the bread its airy, tender texture.
The ideal time to eat the buns is the same day they are made - when they are freshest, with the best texture and flavor (especially the crisp cookie topping).
How to Make Melon Bread
Make the bread dough: To start, combine the bread flour, sugar, salt, yeast, vanilla, egg, and milk in a stand mixer fitted with a dough hook. Mix just until a sticky dough forms, then add the softened butter and knead for about 12-15 minutes. You're looking for a smooth, elastic dough that passes the windowpane test. Once ready, cover the bowl with plastic wrap and leave it to proof at room temperature until doubled in size - this usually takes about 1 to 1.5 hours.
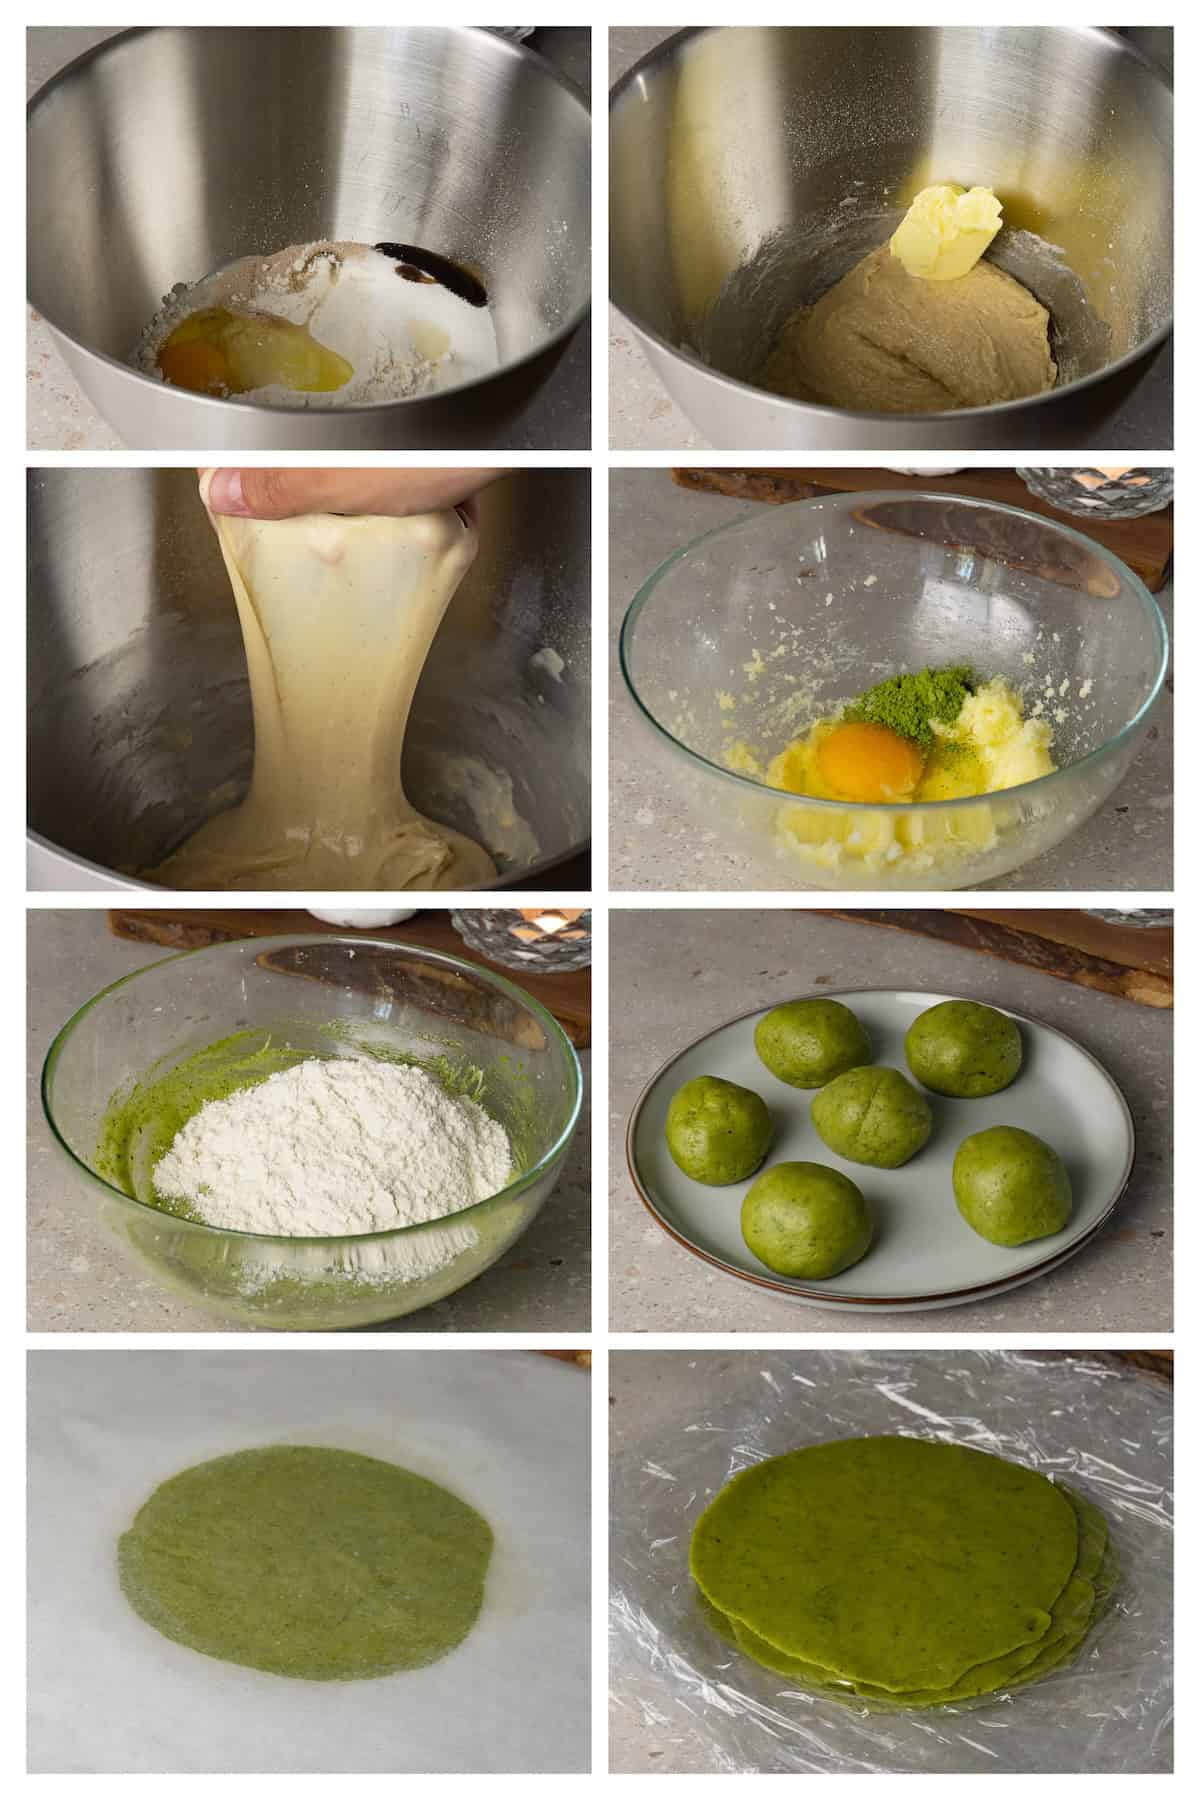
Make the cookie topping: While the dough is rising, prepare the cookie layer. Cream the butter and sugar until light and fluffy, then mix in the egg and matcha powder until smooth. Fold in the flour with a spatula to form a soft but pliable dough. Divide the cookie dough into 6 balls, and roll each between parchment sheets into discs about 4½ inches (12 cm) in diameter. Chill them in the fridge layered with plastic wrap to prevent sticking.
Assemble the buns: Once the bread dough has finished its first rise, punch it down, divide it into 6 equal parts, and form them into smooth balls. Take a chilled cookie disc (using the plastic wrap to help lift it), and place it over a dough ball. Gently mold it around the top and sides, leaving the bottom partially exposed. Trim any excess dough on the bottom if necessary and smooth out the surface.
Lightly press the top of each bun into a plate of sugar, then score a criss-cross pattern on the sugared surface using the back of a knife. Arrange the buns on a parchment-lined baking sheet, leaving space between each, and let them proof a second time until puffy - about 40 to 60 minutes.
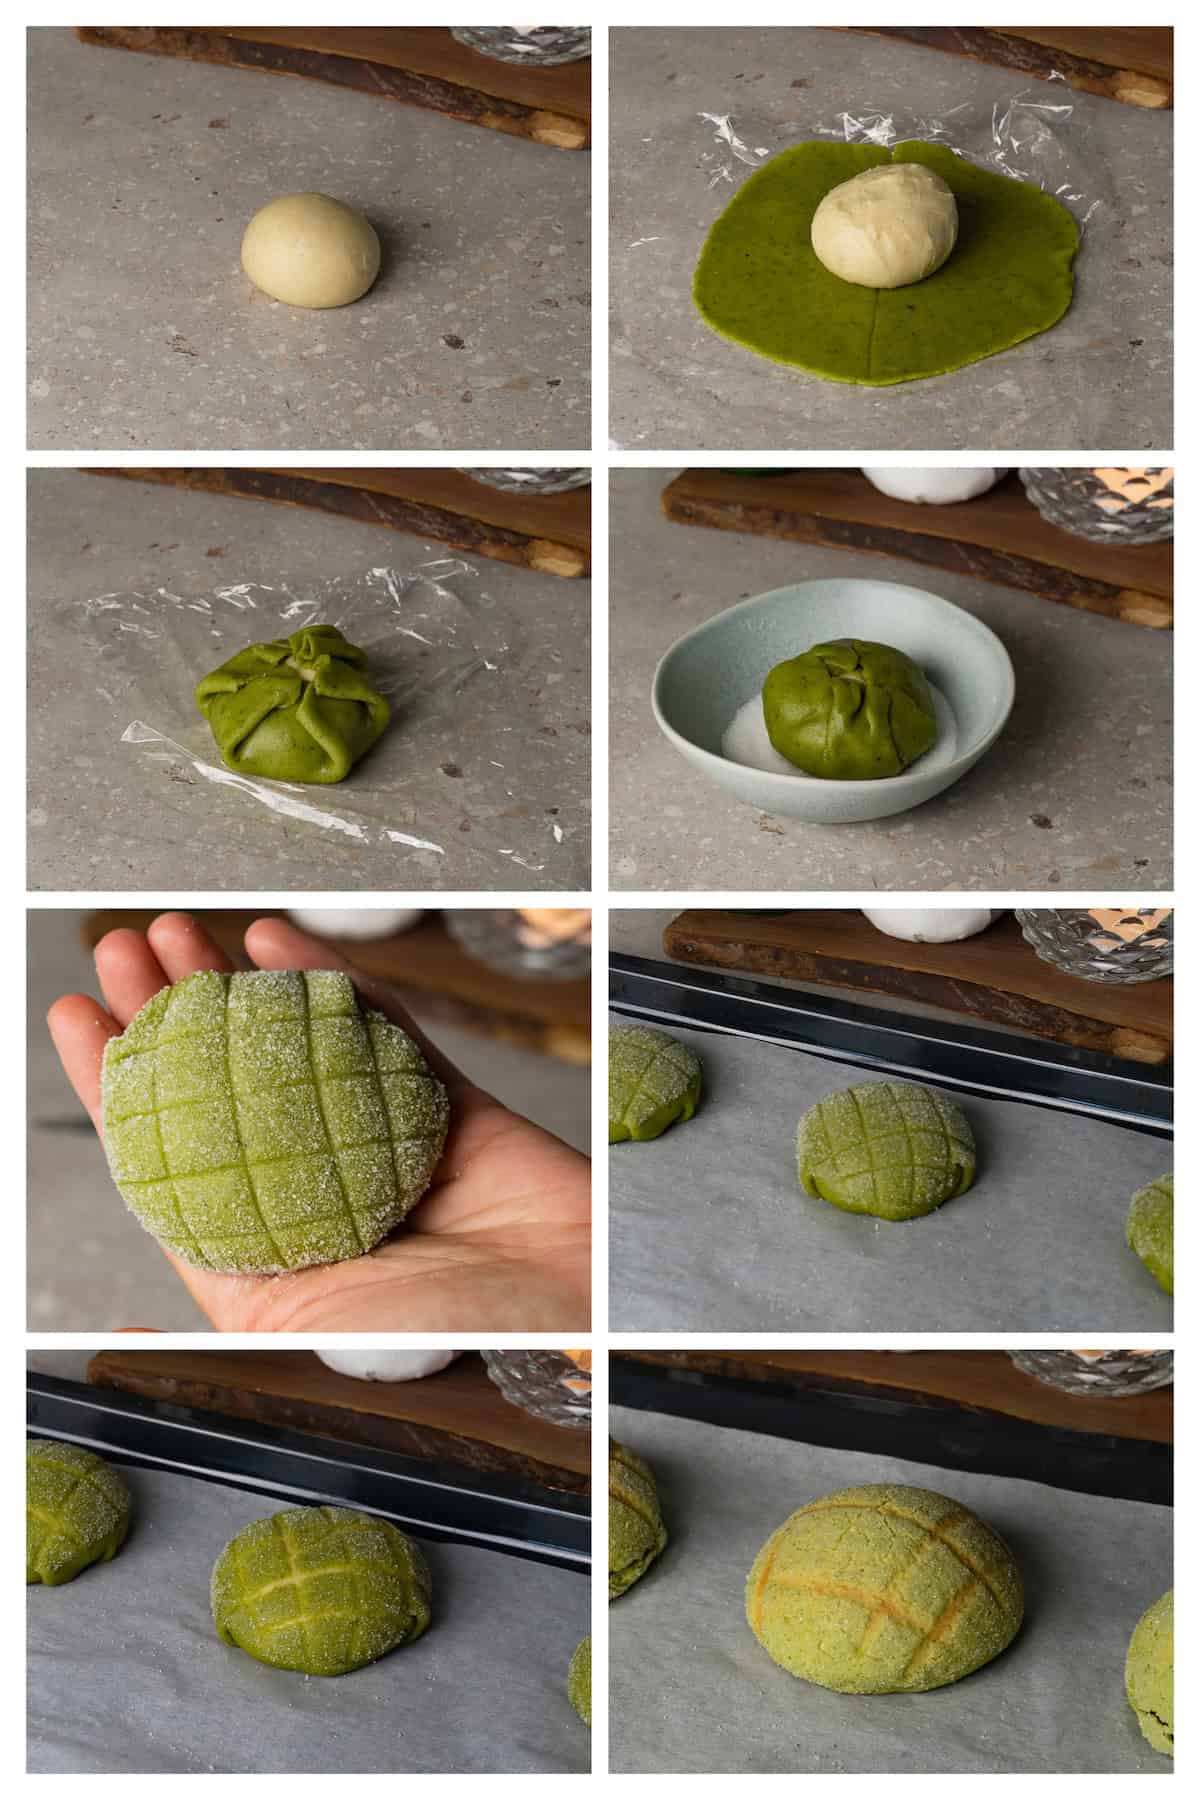
Bake: Preheat your oven to 190C (375F). Once the buns have risen, bake them for about 15 minutes, or until the tops are lightly golden and the bread is fully puffed. Let them cool on a wire rack before enjoying.
Flavor variations
While classic Japanese melon bread is delicious as-is, there's plenty of room to get creative with flavors and fillings. Here are a few ideas to try:
Chocolate chip - Add mini chocolate chips to the cookie topping dough.
Strawberry - Replace the matcha powder with a teaspoon of freeze-dried strawberry powder for a cute pink hue and fruity flavor.
Filled melon bread - Bake the bread, cool it, and then cut it in half. Fill the center with fresh fruit compote and sweetened whipped cream.
Vanilla sugar crust - Skip the matcha and coat the cookie layer in vanilla sugar before scoring for a simple but delicious option.
Storing and freezing tips
Room temperature - Once completely cooled, melon bread can be stored in an airtight container at room temperature for up to 2 days. Keep them away from heat and humidity to prevent the cookie topping from becoming too soggy.
Freezing - Wrap each bun tightly in plastic wrap and place in a freezer-safe bag. They'll keep for up to 1 month. To serve, thaw at room temperature for a few hours or warm them in a 300F (150C) oven for 5-7 minutes.
Recipe card

Japanese Melon Bread
Equipment
- Digital kitchen scale
- Stand mixer with a hook attachment or a hand mixer with dough hooks attachments (+ you will need beaters)
- Mixing bowl
- Rubber spatula
- Rolling Pin
- Parchment paper
- Plastic wrap
Ingredients
For the dough
- 200 g bread flour
- 30 g white granulated sugar
- 1 teaspoon salt
- 4 g instant yeast
- 1 teaspoon vanilla extract
- 1 egg at room temperature
- 90 ml whole milk at room temperature
- 30 g unsalted butter at room temperature
For the cookie topping
- 30 g unsalted butter
- 60 g white granulated sugar
- 1 egg at room temperature
- 125 g all-purpose flour
- 1 teaspoon matcha powder ceremonial grade
Instructions
Making the dough and the cookie topping
- Into the bowl of a stand mixer fitted with a dough hook, add the bread flour, sugar, salt, instant yeast, vanilla extract, egg, and milk. Knead for about 3 minutes, or until a sticky dough forms.
- Add the butter and continue kneading for 12-15 minutes, or until the dough passes the windowpane test - you should be able to stretch a small piece into a thin, translucent sheet without tearing. The dough should be smooth and elastic.
- Cover the bowl with plastic wrap and let it proof at room temperature for 1-1.5 hours, or until doubled in volume.
- Meanwhile, prepare the cookie topping. In a medium bowl, beat the butter and sugar until light and fluffy.
- Add the egg and matcha powder, and beat until the mixture is smooth and well combined.
- Fold in the flour using a rubber spatula until no dry flour remains.
- Divide the cookie dough into 6 equal portions. Roll each portion into a ball.
- Place each ball between two pieces of parchment paper and roll it into a disc about 4½ inches (12 cm) in diameter. Peel off the top layer of parchment paper, replace it with a piece of plastic wrap, then flip the whole thing over and remove the remaining parchment paper. (You can absolutely roll the dough between two pieces of plastic wrap and simply peel one off, leaving the other attached to the dough, but I prefer using parchment paper for rolling.) You should now have a cookie dough disc resting on a piece of plastic wrap. Repeat with the remaining cookie dough.
- Stack the discs on top of each other so the plastic wrap separates them to prevent sticking. Refrigerate until ready to use.
Assembling and baking
- Once the bread dough has finished proofing, punch it down to deflate and transfer it to a lightly floured surface. Divide it into 6 equal parts and roll each into a smooth ball.
- Take one cookie dough disc, using the plastic wrap to help handle it, and place a dough ball in the center. Gently wrap the cookie disc over the top, sides, and just slightly onto the bottom of the bread dough. Do not fully encase the dough in the cookie topping. Leaving the bottom slightly exposed allows the cookie layer to expand properly during baking. If needed, trim any excess cookie dough from the bottom using a small knife.
- Carefully press the cookie dough to smooth any creases. Then, flip the assembled bun and lightly press the top into a plate of granulated sugar, coating the surface evenly.
- Flip the bun back over and use the back of a knife or a dough scraper to gently score a criss-cross pattern on the sugared surface to resemble a melon's rind. Be careful not to cut through the cookie topping. Repeat with the remaining dough balls and cookie discs.
- Place the assembled buns on a parchment-lined baking sheet, spaced at least 2 inches (5 cm) apart. Cover loosely with plastic wrap and let them proof for another 40-60 minutes, or until slightly puffy.
- Preheat your oven to 190C (375F).
- Once the buns have finished proofing, bake for 15 minutes, or until the buns are expanded and the cookie crust is lightly golden.
- Transfer to a wire rack to cool completely.
Leave a comment