
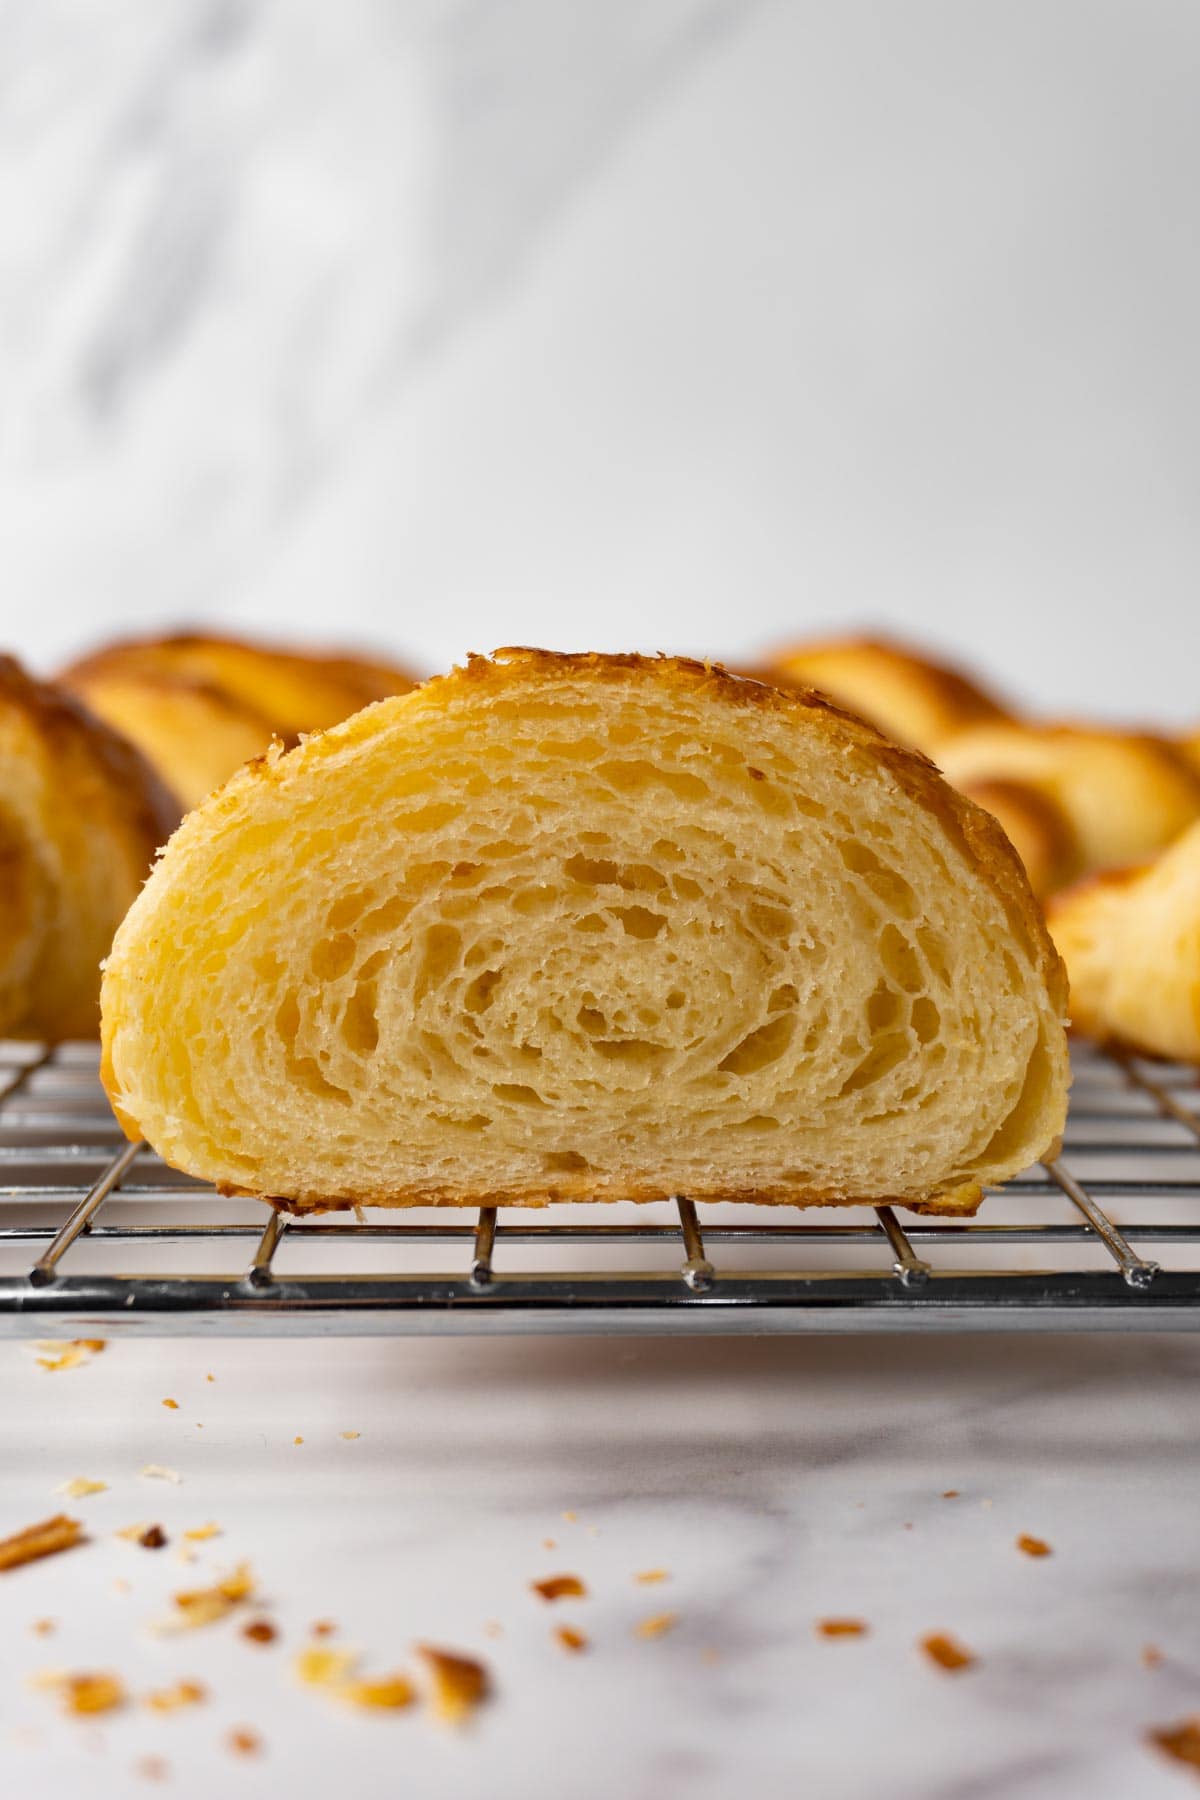
If you want to make flavorful, buttery croissants with a flaky top and tender interior, look no further! This croissant recipe includes everything you need to know to make this legendary pastry at home.

Jump to:
Why you should try this recipe
A small batch. When trying a new, complicated recipe, it's always good to start with a small batch.
Easy to double the recipe. Same as with my Danish pastry, if you feel confident in your baking skills then you can double this croissant recipe by multiplying every single ingredient by 2. I prefer making two separate batches because it's easier to roll out and work with smaller pieces of dough at home!
Detailed instructions. There's a lot to consider when you make croissants, but I tried to cover everything I know in this post. Also, you can find a schedule that can be useful to understand the cooking timeframe further in the post.
What butter to choose
The better butter you use, the easier it is to work with the dough and the tastier your French croissants will be, because croissants should have a very rich, buttery flavor.
You'll need to use a European-style unsalted butter that has 82% fat in it. This type of butter has less water content, which keeps it more pliable when chilled.
What flour to choose
You will need good quality bread flour with 11-12% protein in it to create a very elastic dough that won't tear apart easily, keeping the butter inside.
Some brands make all-purpose flours with higher protein content. Those flours should also be fine to use.
Other ingredients you will need
Yeast - I use instant yeast, but you can replace it with the same amount of dry active yeast.
Salt and sugar - These are our flavor developers along with the yeast.
Milk and water - I like to use a 50/50 mix of milk and water, but you can use 140ml of whole milk or 140ml of water instead. Also, make sure that the liquids are lukewarm before adding them to the dry ingredients.

Cooking tips
Use a digital kitchen scale to weigh the ingredients. This is the only way to make this recipe work!
Preparation is the key. Take your time and make sure that your dough and butter are at the right size before you start laminating them together.
Chill the dough well before each fold. The gluten needs some time to relax and the dough and butter need to chill before you roll them again. This will not only make your work faster and easier, but it will prevent the dough from breaking and leaking out the butter.
Make sure that the tail of the croissant is under the croissant body before baking or it will unroll in the oven, when the dough starts expanding.
If you see a large air bubble under the dough layer, pop it. If your yeast is very active or you trapped a little air when you were enclosing the butter block in the dough, you might see an air bubble on the surface of your dough slab during rolling. If the bubble is big, pop it carefully with a toothpick and pinch the opening to seal it.
Enjoy the experience. Baking should be fun! Even if your dough has broken a bit and your croissants aren't perfectly shaped, don't be upset! I'm sure that they will taste amazing regardless.
Step by step directions
Making the dough (détrempe)
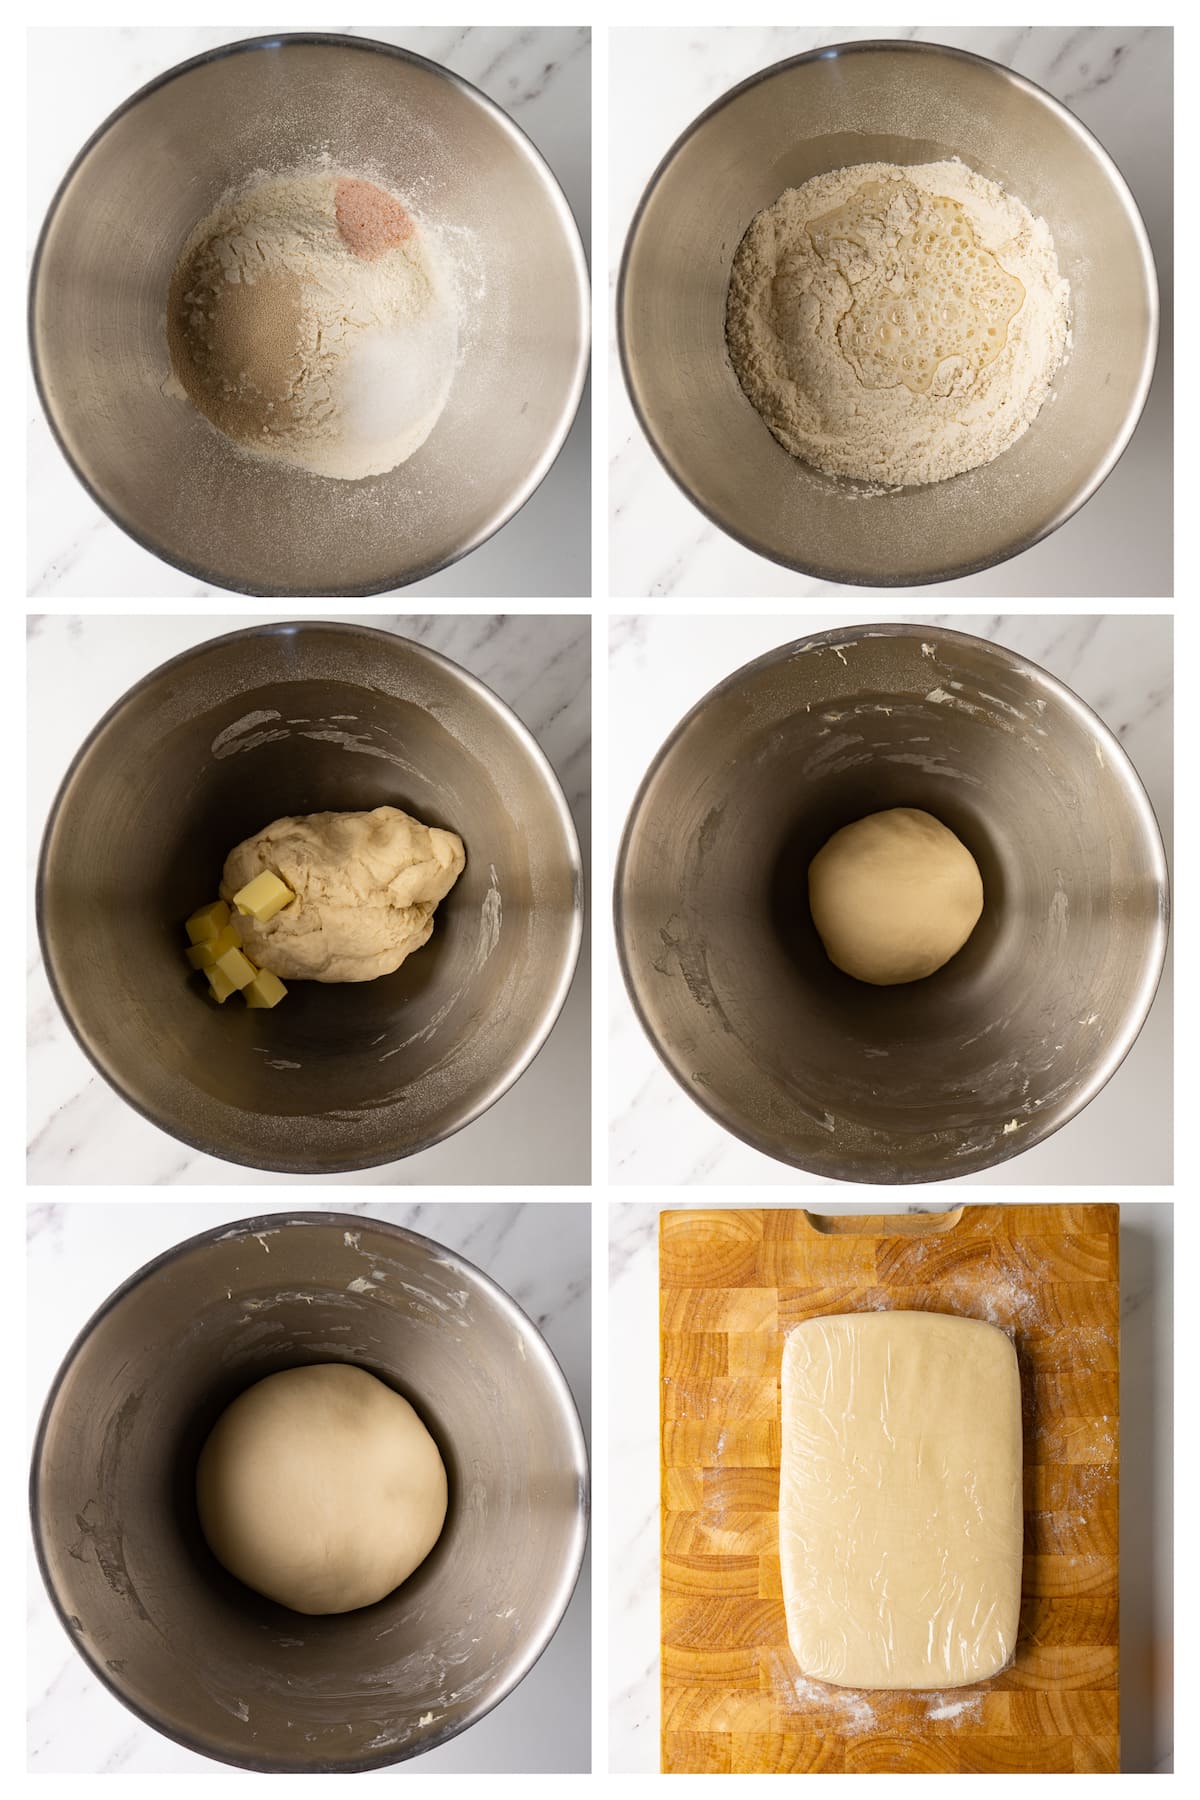
1. In the bowl of a stand mixer fitted with a dough hook attachment, whisk together the flour, yeast, sugar, and salt.
2. Add the milk and water and knead on low for 4 minutes until a shaggy piece of dough has formed. Cover the bowl with plastic wrap and leave to rest for 10 minutes.
3. Add the butter and knead on medium-low for 8 minutes or until the dough is smooth, stretchy, and not sticky to the touch.
4. Proof the dough for 1-1.5 hours at room temperature or until almost doubled in volume.
5. Deflate and roll out the dough on a floured surface into a 5" by 11" (13cm by 28cm) rectangle. Wrap it in plastic wrap and freeze it for 1 hour, then transfer it to the fridge for 4 -12 hours.
Making the butter block (beurrage)
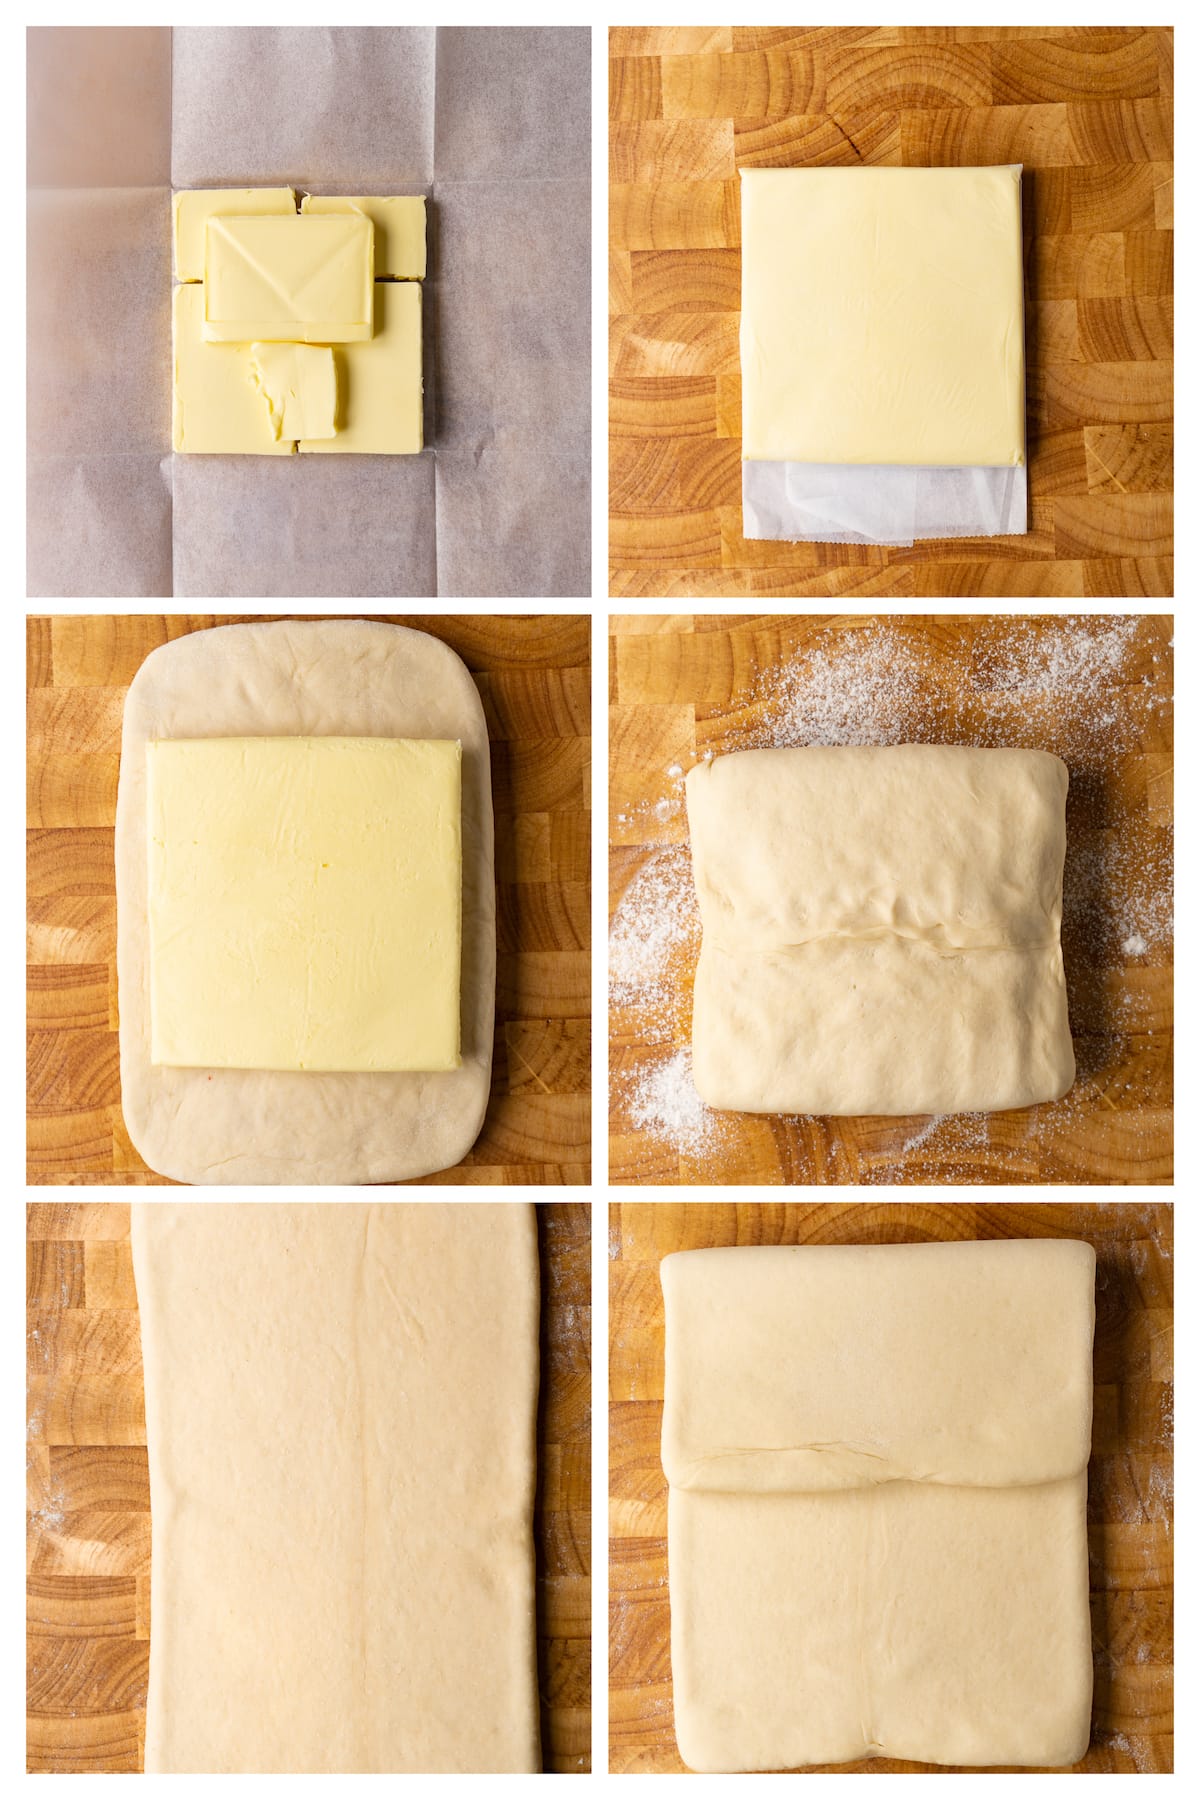
1. Arrange pieces of the butter on parchment paper into 4 ½" by 4 ½" (12cm by 12cm) square. Fold the parchment paper on all sides. Gently beat the butter with the rolling pin to connect all the pieces.
2. Roll the butter within the envelope, gently forcing it into the corners and creating a precise square that is even in thickness. Refrigerate for 15 minutes or until cold but still bendable.
Laminating
1. Place the dough onto a lightly-floured surface and position the butter block in the middle so it has thin dough borders on the left and right sides.
2. Fold the bottom and top dough overhangs towards the center of the butter block so they meet. Pinch them and the dough on the sides to seal the butter inside.
3. Rotate the slab 90 degrees left and add some flour underneath. Gently beat it with the rolling pin, elongating the dough and filling the possible space inside the slab with butter. Roll it into a 7" by 14" or 18cm by 36cm slab.
4. Brush off the visible white flour (do this every time before folding the dough).
5. Do the first three-fold turn, aka letter fold or simple fold: fold the bottom third over the middle third. Then, fold the top third over the bottom third that you folded previously. From the side, this fold should look like a spiral. Wrap it with plastic wrap and refrigerate for 1 hour.
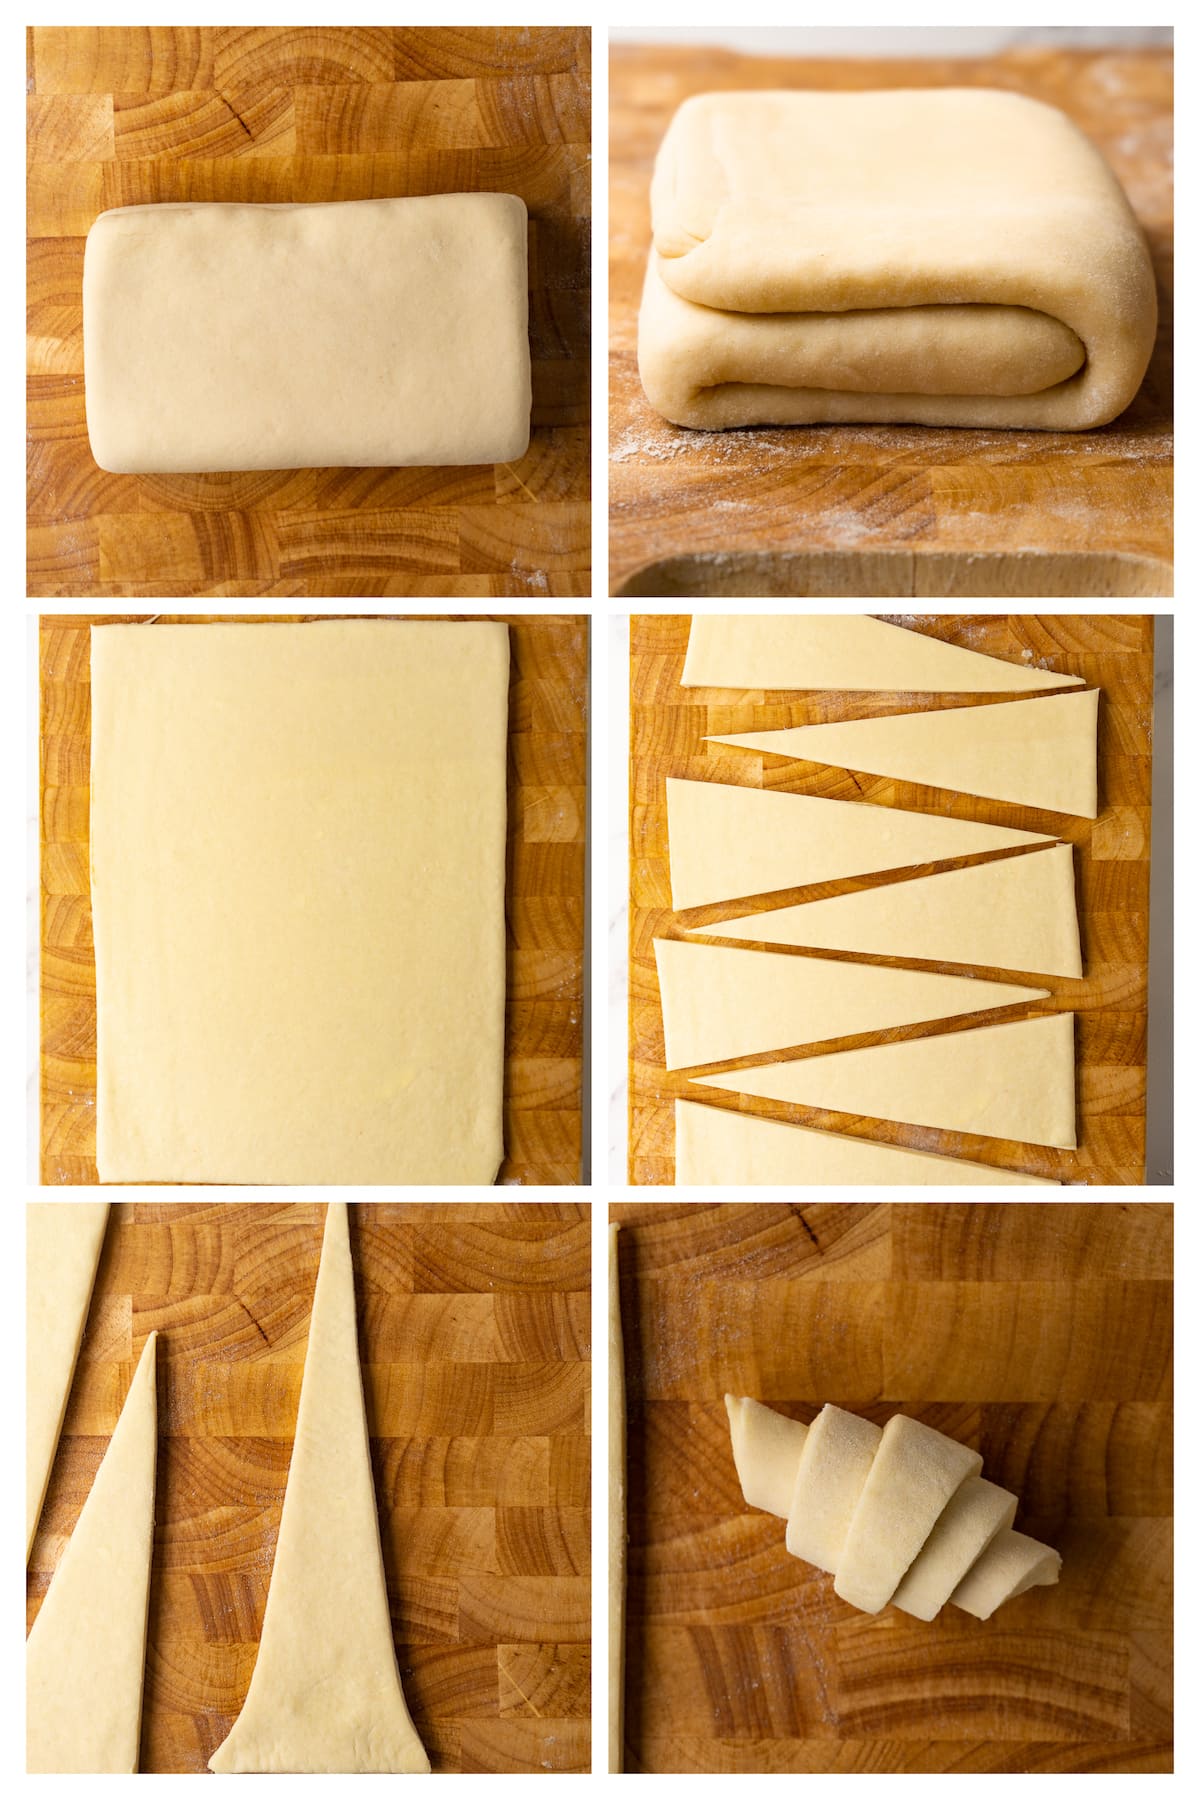
6. Turn the dough 90 degrees left, so the exposed end of the spiral is looking to the left side before you start rolling. Roll the dough into a 7" by 14" or 18cm by 36cm slab.
7. Perform the three-fold turn two more times with 1 hour of refrigerating time in between.
Shaping and baking
1. Line a baking sheet with parchment paper.
2. Roll the dough into a slab and cut it into six triangles. Separate them.
3. Take one triangle and gently elongate it by tugging its long, pointy tail. Then tug the short tails of the triangle outwards a bit and roll the croissant from the short side of the triangle towards the tail.
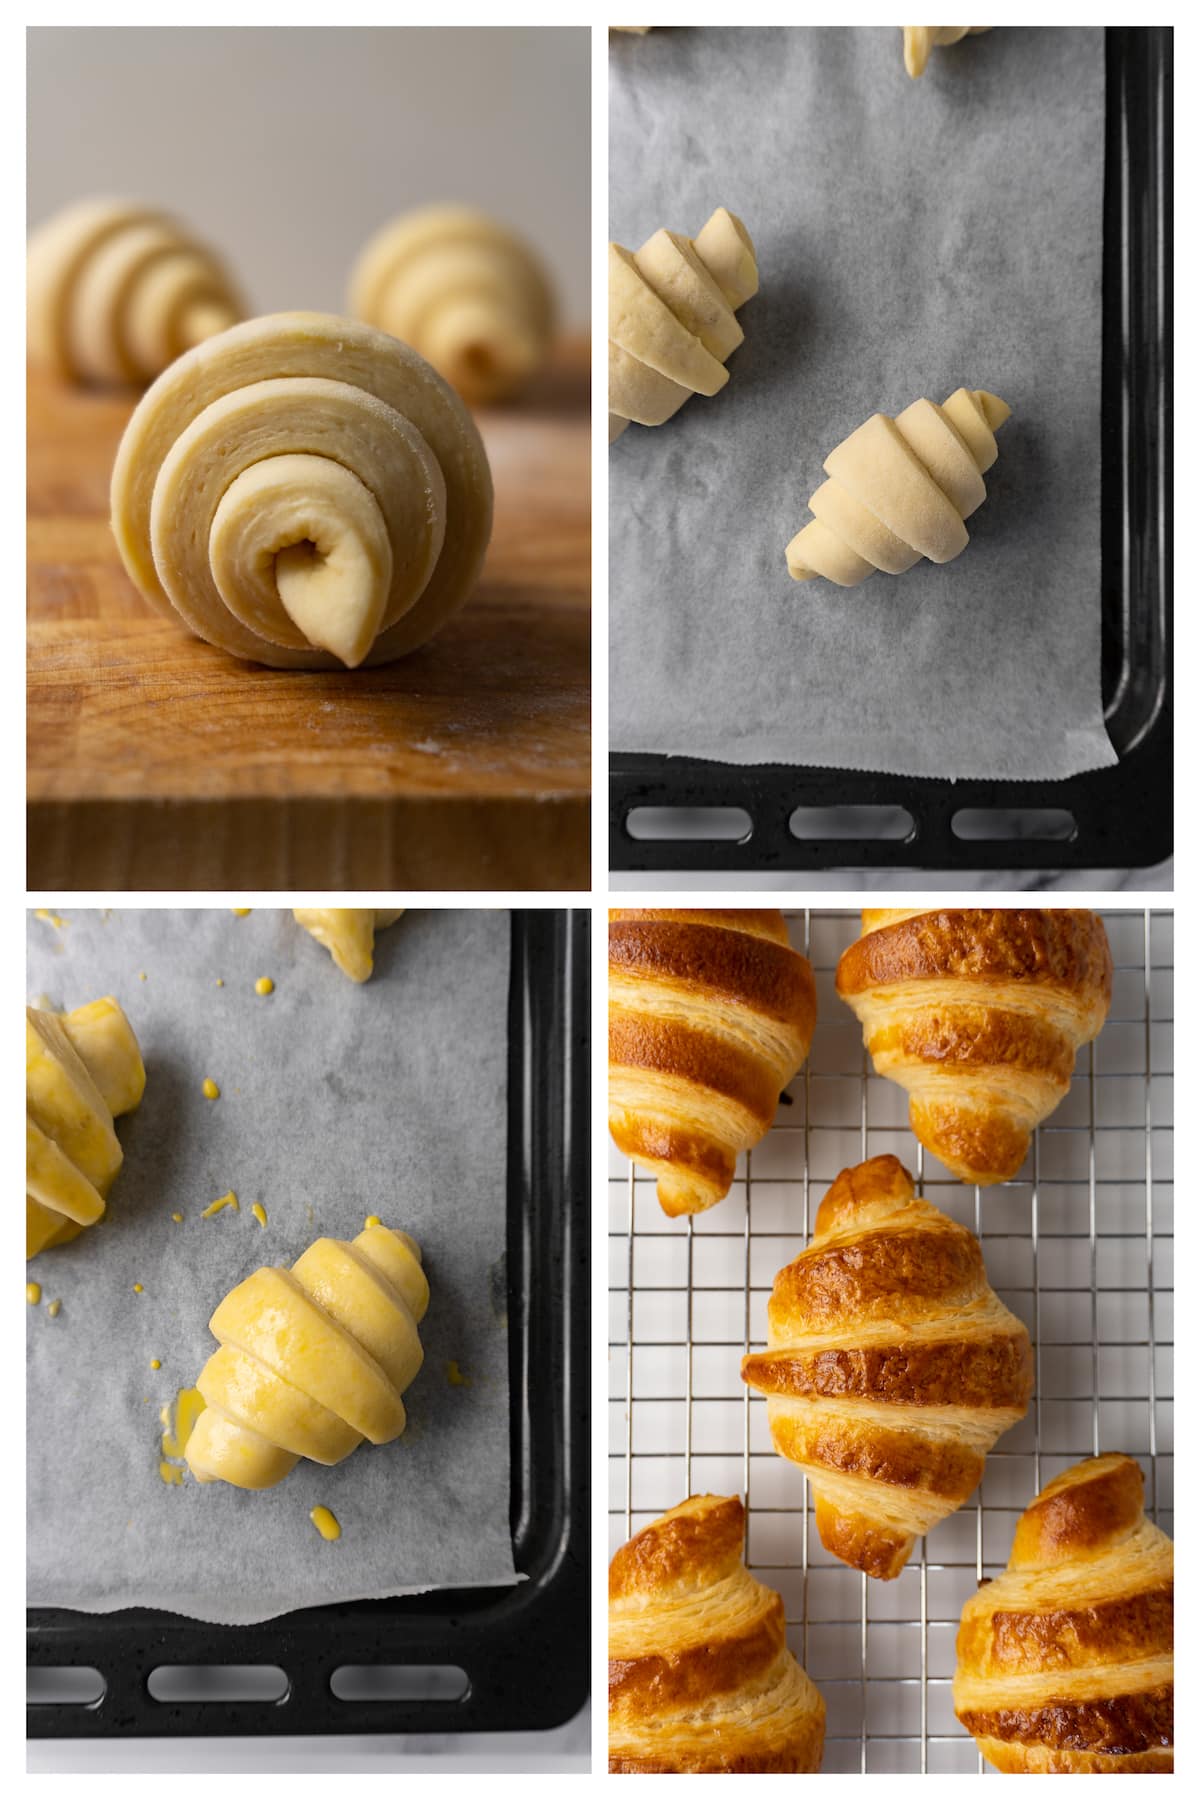
4. Place the croissant on a baking sheet so the pointy tail is precisely under the croissant body. Repeat with the rest triangles.
5. Proof the croissants for 1.5-2 hours or until they are puffed up and jiggly if gently shaken.
6. Preheat the oven to 200C (390F).
7. Brush the croissants with egg wash and bake in the middle of the oven for 15 - 17 minutes or until deep golden brown. Serve warm!
Schedule example you can follow
Day 1 (morning)
9 a.m. - Make the dough and proof at room temperature.
10:30 a.m. - Shape the dough into a rectangle and refrigerate.
Day 1 (evening)
6 p.m. - Enclose the butter block, roll it into a slab, and perform the first three-fold turn.
7 p.m. - Roll out the slab and perform the second three-fold turn.
8 p.m. - Roll out the slab and perform the third three-fold turn.
8:10 p. m. - Wrap the dough tightly in plastic wrap and freeze.
9 p.m. - Transfer the dough to the fridge overnight.
Day 2 (morning)
8 a.m. - Roll out the dough and cut it into triangles.
8:10 a.m. - Shape the croissants, then cover them with plastic wrap to proof them in a warm place (preferably in the oven with lights on and the door slightly open). Remove from the oven right before you start preheating it.
(Preheat the oven)
10 a.m. - Brush with the egg wash and bake.
Serving ideas
Toppings - Dust your buttery croissants with powdered sugar or drizzle some Chocolate ganache on top.
Savory sandwich - You can make a ham and cheese croissant sandwich for lunch, or use salami, salad leaves, and Brie cheese slices instead.
Sweet filling - Lightly-sweetened, whipped cream and fresh fruit in between two halves of croissant pastry sound amazing to me. You can also use Salted caramel or Raspberry coulis as sweet fillings for your homemade croissants.
How to reheat croissants
Croissants should be enjoyed the same day they are baked because they can go stale and lose their crispiness quickly. However, reheating croissants is an excellent option to revive their texture and restore their buttery flavor.
To reheat croissants, use your oven. Preheat it to 350°F (180°C) and place the croissants on a baking sheet lined with parchment paper. Bake them for 5-10 minutes, depending on their size, until they are hot and crispy on the outside.
Alternatively, you can microwave the croissants for 10-15 seconds, but they most likely become soggy.

FAQ
Store them in a paper bag at room temperature for up to 2 days.
Yes, you can. Wrap individual, completely-cooled croissants in plastic wrap and then in foil. Freeze for up to 2 months. Thaw in the fridge, then reheat in the oven before serving.
The best way to freeze croissant dough is after shaping them. Cut the triangles, roll them into croissant spirals, secure the tail under them, and place them on a tray that will fit in your freezer. Freeze until solid and then transfer into a zip-lock bag or pack individually. Continue freezing for 2-3 months. Before baking, thaw in the fridge until softened, then proof at room temperature until almost doubled in volume. Bake according to the recipe instructions.
More related recipes
Recipe card

Croissant recipe
Equipment
- Digital kitchen scale
- Stand mixer with a dough hook attachment or a hand mixer with hook attachments and a large mixing bowl
- Plastic wrap
- Parchment paper
- Pizza Cutter or a long sharp knife
- Pastry brush
Ingredients
Dough (détrempe)
- 250 g bread flour
- 5 g salt
- 3.5 g instant yeast
- 20 g white granulated sugar
- 70 ml whole milk lukewarm
- 70 ml water lukewarm
- 25 g unsalted butter at room temperature
Butter block (beurrage)
- 145 g unsalted butter
Egg wash
- 1 egg yolk
- 1 tablespoon heavy cream
Instructions
Day 1 (morning): Making the dough
- In the bowl of a stand mixer fitted with a dough hook attachment (or use a hand mixer with a hook attachment, or knead the dough by hand in a large mixing bowl), add the flour, yeast, sugar, and salt. Mix to combine.
- Add the milk and water and knead on low for 4 minutes until a shaggy piece of dough has formed. Cover the bowl with plastic wrap and leave to rest for 10 minutes.
- Then, add the butter and knead on medium-low for 8 minutes or until the dough is smooth, stretchy, and not sticky to the touch.
- Cover the bowl with plastic wrap and a kitchen towel. Leave to proof for 1-1.5 hours at room temperature or until almost doubled in volume.
- Deflate and roll out the dough on a floured surface into a 5" by 11" (13cm by 28cm) rectangle. Be as precise as possible. Wrap it in plastic wrap and freeze it for 1 hour, then transfer it to the fridge for 4-12 hours.
Day 1 (evening): Butter block
- Draw a 4 ½" by 4 ½" (12cm by 12cm) square on parchment paper using a ruler and a pencil. Arrange pieces of the butter so they approximately fill in the square. Fold the parchment paper on all sides, following the lines and enclosing the butter. Gently beat it with the rolling pin, evenly spreading and connecting the pieces.
- Roll the butter within the envelope, gently forcing it into the corners and creating a precise square that is even in thickness. Refrigerate for 15 minutes or until cold but still bendable.
Laminating
- Place the dough onto a lightly-floured surface and position the butter block in the middle so it has thin dough borders on the left and right sides.
- Fold the bottom and top dough overhangs towards the center of the butter block so they meet. Pinch them and the dough on the sides to seal the butter inside.
- Rotate the slab 90 degrees left and add some flour underneath. Gently beat it with the rolling pin, elongating the dough and filling the possible space inside the slab with butter. Roll it to make it even and adjust the ends so the dough keeps a rectangular shape. The slab should be approximately 7" by 14" or 18cm by 36cm.
- Brush off the visible white flour (do this every time before folding the dough).
- Do the first three-fold turn, aka letter fold or simple fold: fold the bottom third over the middle third. Then, fold the top third over the bottom third that you folded previously. From the side, this fold should look like a spiral. Wrap it with plastic wrap and refrigerate for 1 hour.
- Turn the dough 90 degrees left, so the exposed end of the spiral is looking to the left side before you start rolling. Roll the dough into a 7" by 14" or 18cm by 36cm slab. If any air bubbles appear on the surface, gently burst them with a toothpick and seal the dough again to prevent the butter from leaking out later down the road.
- Perform the three-fold turn two more times with 1 hour of refrigerating time in between. In total, you should perform 3 three-fold turns.
Day 2 (morning): Shaping and baking
- Line a baking sheet with parchment paper.
- Let the dough warm up for a few minutes at room temperature. Then, roll it into a 9" by 12" (23cm by 31cm) slab and cut it into six triangles and separate them.
- Take one triangle and gently elongate it by tugging its long, pointy tail. Then tug the short tails of the triangle outwards a bit and roll the croissant from the short side of the triangle towards the tail. The croissant should be rolled tight but not to the point that the layers are squeezed.
- Place the croissant on a baking sheet so the pointy tail is precisely under the croissant body. Gently press on top of the croissant to secure the position. Repeat with the rest triangles.
- Cover the croissants with plastic wrap and place them in a warm, draft-free space to proof for 1.5-2 hours or until they are puffed up and jiggly if gently shaken. I proof my croissants in the oven with the lights turned on until it's time to start preheating the oven.
- Preheat the oven to 200C (390F).
- Brush the croissants with egg wash and bake in the middle of the oven for 15 - 17 minutes or until deep golden brown. Serve warm!


Leave a comment